
Are you ready to take your indoor cycling workouts to the next level? If so, investing in a pair of Peloton shoes can greatly enhance your riding experience. Whether you’re a seasoned cyclist or just starting out, properly setting up your Peloton shoes is crucial for achieving maximum comfort and performance. In this guide, we will walk you through the step-by-step process of how to set up your Peloton shoes like a pro, ensuring that you are ready to tackle any workout that comes your way.
Thank you for reading this post, don't forget to subscribe!First and foremost, let’s talk about the importance of finding the right fit for your Peloton shoes. Ill-fitting shoes can lead to discomfort and even potential injuries during your rides. To begin, ensure that you have the correct shoe size. Peloton shoes tend to run true to size, so it’s recommended to order your regular shoe size. However, keep in mind that the fit may vary depending on the brand, so it’s always a good idea to check the sizing chart provided by Peloton. Once you have your shoes, it’s time to adjust the cleats to your specific needs. Cleat position is crucial for optimizing power transfer and preventing any strain on your joints. By following the simple instructions provided in this guide, you’ll be able to set up your Peloton shoes correctly, allowing you to crush your workouts with confidence and comfort.
How to Set Up Peloton Shoes:
- Unbox your Peloton shoes and remove any packaging materials.
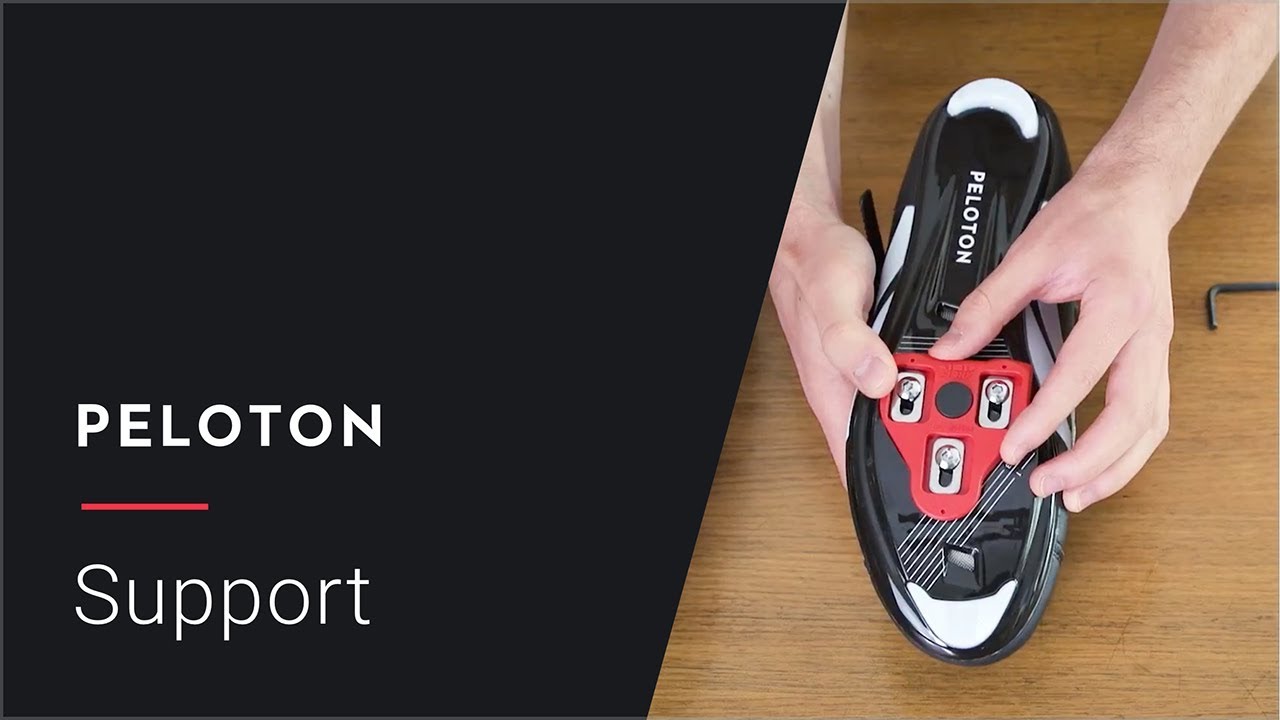
- Insert the cleats into the designated slots on the bottom of the shoes and tighten the screws using the provided Allen wrench.
- Put on the shoes and adjust the fit using the Velcro straps or BOA closure system.
- Connect the shoes to your Peloton bike by sliding them into the toe cages and securing them with the straps.
- Once properly set up, make sure the shoes are securely attached before starting your workout.
How to Set Up Peloton Shoes
Are you excited to start your Peloton journey but unsure how to set up your Peloton shoes? Look no further! In this step-by-step guide, we will walk you through the process of setting up your Peloton shoes, ensuring a comfortable and efficient workout experience.
Step 1: Unboxing and Checking the Contents
When your Peloton shoes arrive, begin by carefully unboxing them. Inside the box, you should find the shoes, cleats, and any additional accessories. Take a moment to inspect the contents and ensure that everything is included and in good condition. If you notice any missing or damaged items, contact Peloton customer support for assistance.
Once you have confirmed that all the necessary components are present, move on to the next step.
Step 2: Installing the Cleats
Now that you have verified the contents, it’s time to install the cleats on your Peloton shoes. Start by locating the cleat mounting holes on the sole of each shoe. The holes are usually marked with an arrow or indicator, making them easy to identify.
Next, take the cleats and align them with the mounting holes. Ensure that the cleats are positioned correctly and securely fastened. You can use an Allen wrench or a similar tool to tighten the screws and secure the cleats in place. Repeat the process for the second shoe.
Step 3: Adjusting the Fit
With the cleats installed, it’s time to adjust the fit of your Peloton shoes. Put on the shoes and fasten the closures, whether they are Velcro straps, laces, or a combination of both. Make sure the shoes feel snug but not overly tight.
If the shoes have adjustable features, such as a BOA dial or straps, experiment with different settings to find the most comfortable fit for your feet. Remember that proper fit is essential for optimal performance and to prevent discomfort or injury during your workouts.
Step 4: Testing and Fine-Tuning
Now that you have set up your Peloton shoes, it’s time to give them a test run. Step onto your Peloton bike and clip your shoes into the pedals. Take a moment to ensure that the shoes are securely engaged with the cleats and that you feel stable and supported.
If you experience any issues or discomfort during the test ride, make any necessary adjustments. This may include tightening or loosening the cleats, readjusting the fit of the shoes, or experimenting with different pedal settings. The goal is to find the perfect setup that suits your individual needs and preferences.
Step 5: Maintenance and Care
Lastly, it’s important to maintain and care for your Peloton shoes to ensure their longevity. After each workout, wipe down the shoes with a clean, damp cloth to remove any sweat or dirt. Allow them to air dry before storing them in a cool, dry place.
Regularly inspect the cleats and fastenings for any signs of wear or damage. If you notice any issues, such as loose screws or worn-out components, replace them promptly to maintain the integrity of your setup.
By following these steps and taking proper care of your Peloton shoes, you can enjoy a comfortable and successful workout experience every time you hop on your Peloton bike.
Frequently Asked Questions
Here are some commonly asked questions about how to set up Peloton shoes:
How do I set up my Peloton shoes?
To set up your Peloton shoes, start by finding a comfortable and well-lit area to work in. Begin by removing any existing pedals from your bike. Then, take the Peloton shoe cleats and attach them to the bottom of your shoes according to the instructions provided. Next, locate the pedals on your Peloton bike and align the cleats with the pedal clips. Press down firmly to engage the shoes with the pedals. Finally, adjust the fit of the shoes by tightening or loosening the straps or dials, ensuring a snug and secure fit for your ride.
It is important to note that proper setup and adjustment may require some trial and error to find the most comfortable and efficient position for your feet. Take the time to experiment and make any necessary adjustments to enhance your overall riding experience.
Can I use my own cycling shoes with Peloton?
Yes, you can use your own cycling shoes with Peloton. If you already have a pair of compatible cycling shoes, you can attach Peloton shoe cleats to the soles and use them with the Peloton bike. This allows you to have a consistent and familiar feel when riding. Make sure to check the compatibility of your shoes and ensure that the cleats are properly installed before using them with the Peloton bike.
Using your own cycling shoes can be especially beneficial if you have specific fit requirements or if you prefer a particular brand or style of shoes. It can also be a cost-effective option if you already own cycling shoes and do not wish to purchase a new pair specifically for Peloton workouts.
How do I adjust the shoe cleats for a proper fit?
Adjusting the shoe cleats for a proper fit is an essential step in setting up Peloton shoes. Start by locating the bolts on the cleats that attach them to the soles of your shoes. Using an appropriate wrench or tool, loosen the bolts to allow for adjustments. Position the cleats on the shoes in a way that feels comfortable and natural for your feet. Consider factors such as foot angle, arch support, and overall alignment.
Once you have found the desired position, tighten the bolts securely to prevent any movement during rides. It is important to note that slight adjustments may be necessary over time as you become more accustomed to the shoes and learn what works best for your individual riding style and foot anatomy.
How should Peloton shoes fit?
Peloton shoes should fit snugly and securely, providing proper support and stability during rides. When putting on the shoes, make sure your feet are properly aligned and centered within the shoes. The shoes should feel comfortably snug around your feet, with no excessive pressure or discomfort. The closure system, whether it be straps, dials, or laces, should be adjusted to achieve a secure fit without causing any restriction or pain.
A proper fit is crucial for an optimal riding experience. Ill-fitting shoes can lead to discomfort, hot spots, or even injuries. Take the time to adjust the fit of your Peloton shoes before each ride, ensuring that they provide the necessary support and comfort for your feet.
What are the benefits of using Peloton shoes?
Using Peloton shoes offers several benefits for your cycling workouts. Firstly, they are specifically designed for compatibility with Peloton bikes, ensuring a seamless connection between your feet and the pedals. This allows for efficient power transfer and a more immersive riding experience.
Peloton shoes also provide enhanced stability and support, thanks to their stiff soles and secure fit. This can help improve your pedaling efficiency and reduce the risk of foot fatigue or discomfort during longer rides. Additionally, using Peloton shoes allows you to take full advantage of the Peloton bike’s metrics and features, such as cadence tracking and accurate power output measurements.
In conclusion, setting up your Peloton shoes is a straightforward process that can greatly enhance your indoor cycling experience. By following the step-by-step instructions provided by the manufacturer, you can ensure that your shoes are properly fitted and securely attached to the bike’s pedals. This not only improves your comfort and safety during workouts but also maximizes the efficiency of your pedal strokes.
Remember, investing a little time and effort in correctly setting up your Peloton shoes can make a world of difference in your overall cycling performance. Whether you are a seasoned athlete or a beginner, having the right shoe fit and pedal connection can help you achieve your fitness goals more effectively. So, take the time to read the instruction manual, make necessary adjustments, and enjoy the ride with confidence and ease. Happy cycling!